

How to Restore Old Photos with AI
Learn a careful workflow for repairing faded, scratched, or damaged family photos with AI while preserving their character.
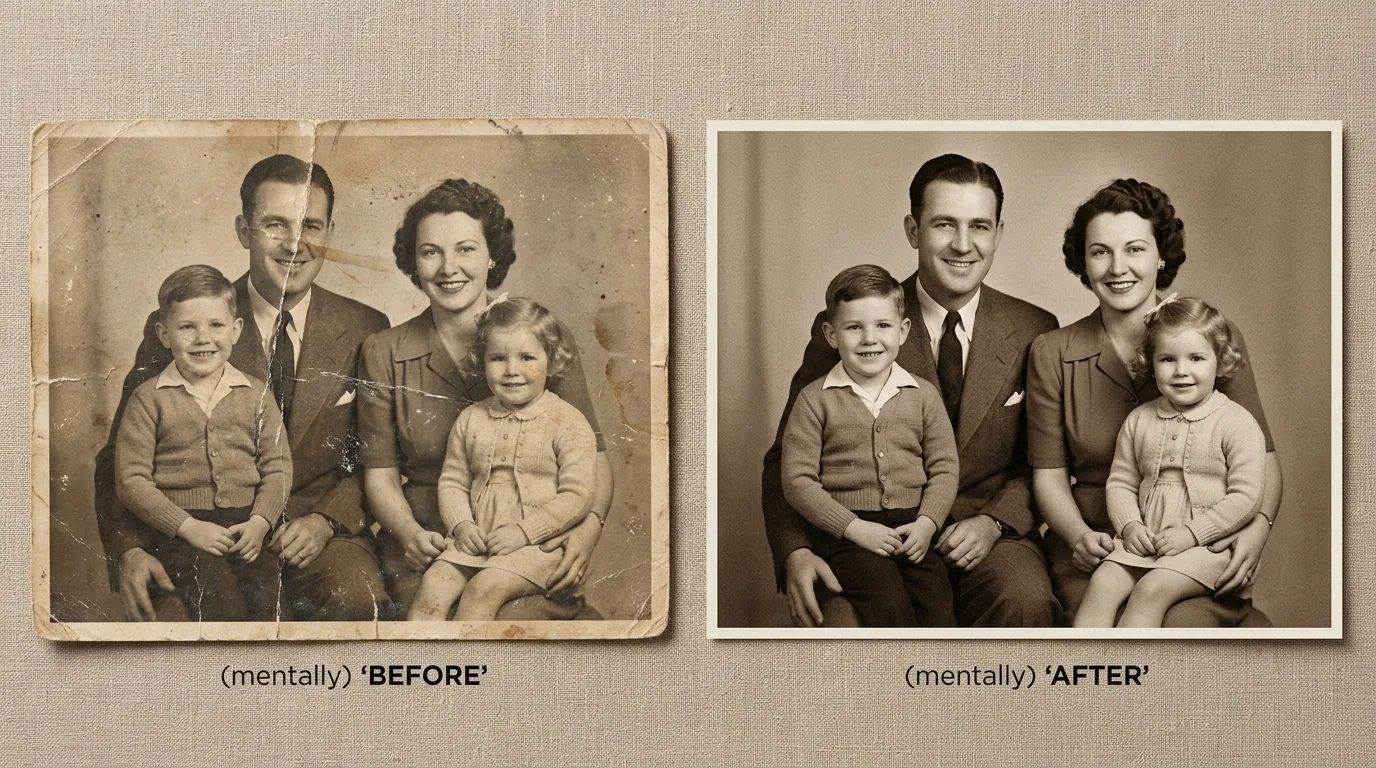
Knowing how to restore old photos with AI can help you make fragile family images easier to view and share. A faded print may have scratches, dust, folds, colour shifts, or low contrast. Restoration works best when you treat the original as a historical record and make improvements carefully instead of trying to turn it into a completely new photograph.
ImageChanger's AI image changer lets you upload an existing image and describe a focused repair. The goal is to recover readable detail, balance the image, and keep the age and character of the photo intact.
Prepare the best possible scan
The result starts with the scan. Wipe loose dust from the scanner bed, place the print flat, and scan at a resolution that leaves room for review. If you only have a phone, use even light, avoid glare, and keep the camera parallel to the photo so the edges are not distorted.
Save an untouched copy before you edit. It is valuable both as an archive and as a reference when deciding whether a restoration has changed too much. If a photo is torn or curled, scan it as carefully as possible rather than trying to repair the physical print first.
Identify the repair, not just the age
Old photos often have more than one problem, but a single focused instruction is easier to evaluate. Start by naming the visible damage: scratches, dust spots, fading, yellow colour cast, creases, or lost contrast. Then describe what should remain authentic, such as facial features, clothing, grain, and the original composition.
For example:
Repair scratches, dust spots, and faded contrast in this family photo. Keep facial features, clothing, original framing, and natural film grain intact. Restore colour gently without making the image look modern or over-smoothed.
This is more reliable than asking for a generic "enhancement." It tells the tool what to fix and what not to invent.
Restore an old photo in three steps
1. Upload a copy of the scan
Open the AI old photo restoration tool and upload a copy rather than your only archival file. Review the image before generation to make sure the important faces and details are visible.
2. Describe the damage and preservation rules
Use a short repair brief. Mention the most obvious defects first, then state what needs to remain unchanged. If the image is black and white, say whether you want it preserved as black and white. Do not request colourisation unless you are comfortable with an interpretive result rather than a verified record.
Restore an old photo with ImageChanger free →
3. Compare the result with the original
Look closely at faces, hands, jewellery, lettering, and the edges of clothing. These are the areas where a restoration can unintentionally invent or blur detail. Check whether scratches and stains are reduced without removing the texture that makes the original believable.
Keep the original and each candidate result. A lightly restored version is often more useful than the most dramatic version, especially for family archives or documentary work.
Common restoration choices
Remove surface damage
Dust, small scratches, and minor stains are reasonable first repairs. Ask to keep the grain and avoid making skin look unnaturally smooth.
Correct fading and contrast
Faded prints can benefit from modest contrast and colour correction. Request a gentle adjustment rather than maximum saturation; a warm cast may be part of the original material, while an extreme correction can erase its character.
Repair folds and tears
Creases and torn edges can be more difficult because they may cross faces or important objects. Restore one damaged area at a time and compare carefully with the source. For a print with major physical damage, consider professional archival advice before relying on a generated reconstruction.
What AI restoration cannot verify
AI can make a damaged image easier to read, but it cannot confirm missing details it has not seen. A cleaned-up face, building, or piece of clothing may look plausible without being historically exact. Label AI-restored images clearly when accuracy matters, and keep an original scan alongside the edited version.
If you need another focused edit after restoration, the AI object remover can help you test the removal of a small modern distraction. For major repairs, work in small steps and review each result.
Preserve first, improve second
A good restoration makes a memory easier to see without making it feel like a different memory. Start with a clear scan, describe the specific damage, and choose the version that protects the most meaningful details.